Here is a complete step-by-step guide on how to setup WhatsApp business API. WhatsApp API can only be used if you follow the compliances according to the business and commerce policy of WhatsApp. In this easy and quick blogpost, I will explain the step-by-step process of setting up the API yourself and link that to Sendwo or any other WhatsApp official API-supporting application.
You need to have a few things beforehand in order to start using the WhatsApp API. Lets look into what you need to have in order to start your setup for WhatsApp API.
Only registered entity can be eligible for using the API. Since API setup needs to be done only over verified business manager. So, in order to verify business manager, you need to submit your business certificates.
While we are verifying the business manager account of facebook, it will ask you for official website of your company. They check the terms and condition page and privacy policy page on your company website.
These pages should show the policy that is 100% in compliance with WhatsApp business policy and commerce policy. If you don’t fall into the category of allowed business, then your business manager verification will be rejected.
This phone number should be your business phone number which must be also mentioned in your business document.
When we do business verification, it ask your business documents like business registration certificates to prove that you are an official government-approved business. In that same document, Meta expects to have your business phone number also mentioned. But, in case the phone number is not mentioned, then it ask, “whether your business document contain phone number or not. If it doesn’t have that, then it ask you to upload any other government separately forwarded letter like a utility bill or bank statement that has both business name as well as your business phone number mentioned.
With these prerequisite, you can ask your WhatsApp integration consultant to help you in getting started with setup of WhatsApp API.
Now, lets go to step by step process
Want Us To Help?
In order to setup the WhatsApp API, either you can start the setup from developers.facebook.com right away or 1st you can choose to get your Facebook business manager account verified.
Now, a lot of people will get stuck at this point. Why? Because here are two loops that stop people from DIY of WhatsApp API.
Loop 1: Setting up API and then going for business verification. [Right path]
Loop 2: Getting business verification done before setting up the API. [Wrong path]
Please note: Only Loop 1 is the right path to follow when you are setting up your WhatsApp API yourself.
Let’s talk about this in detail because everyone will get stuck at this place.
In order to follow this path. You will follow the below step
STEP 1: Go to developers.facebook.com and login with your facebook credentials.
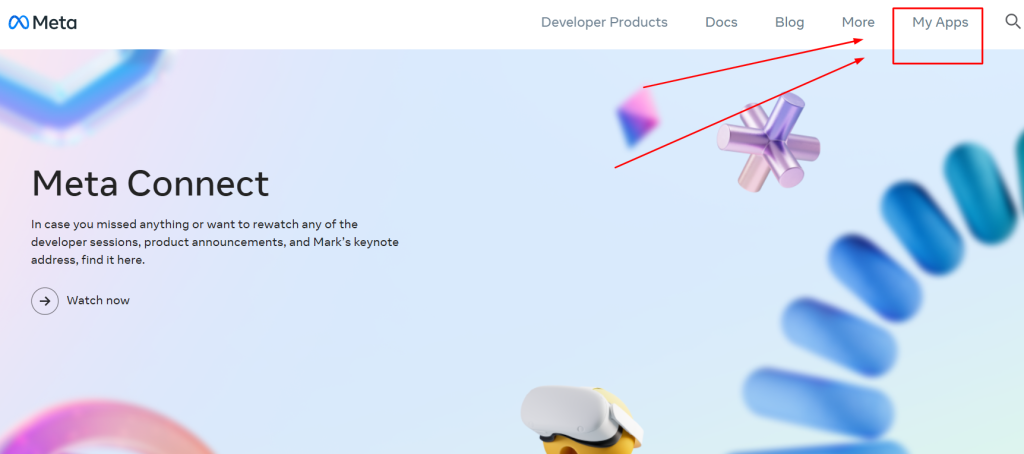
STEP 2: Go to My Apps. This section will take you to create a new app dashboard.
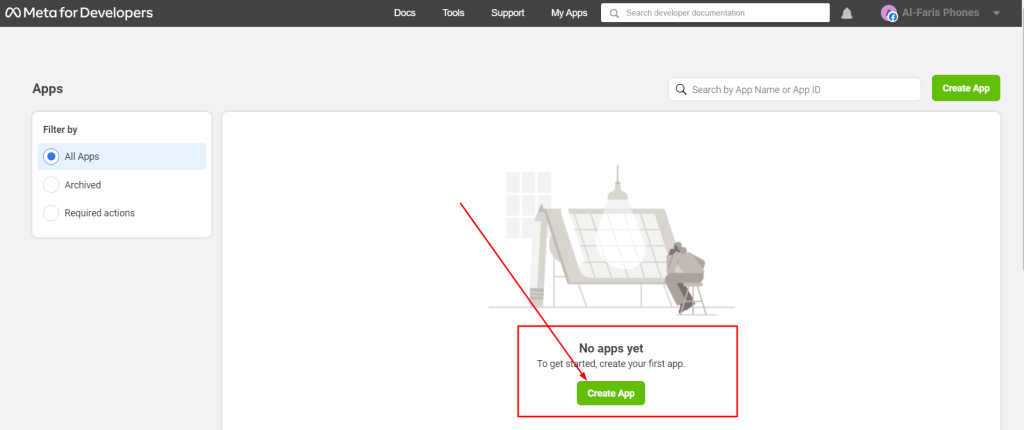
STEP 3: The next step is to click on Create App and then proceed by clicking Others and then click Next.
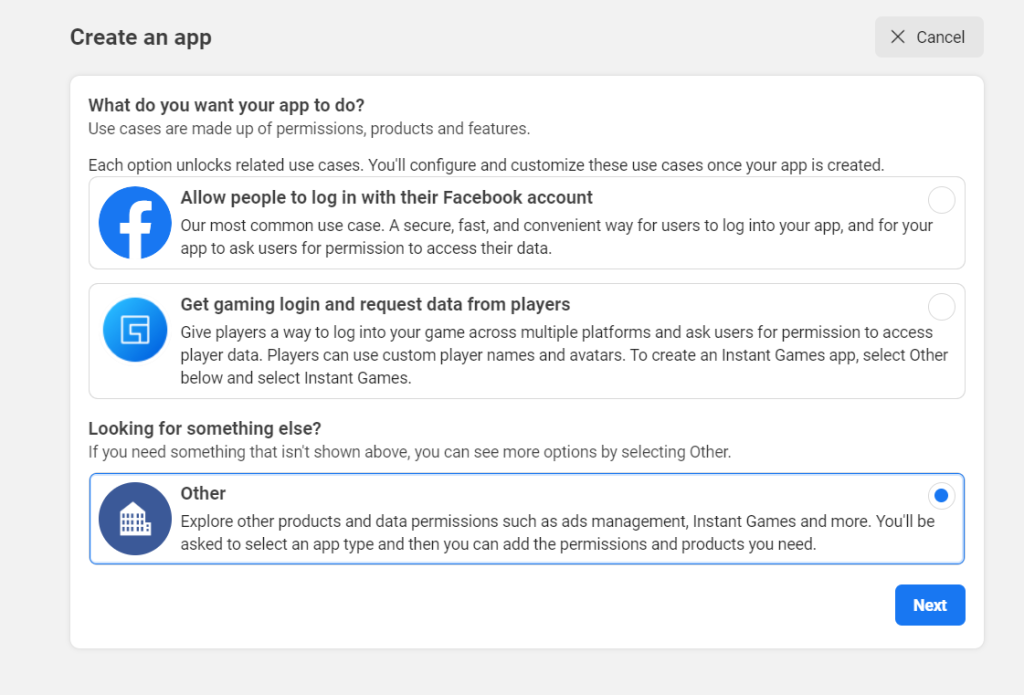
STEP 4: Select the App type in your next step. It should be business because you are going to use the API. Then click next.
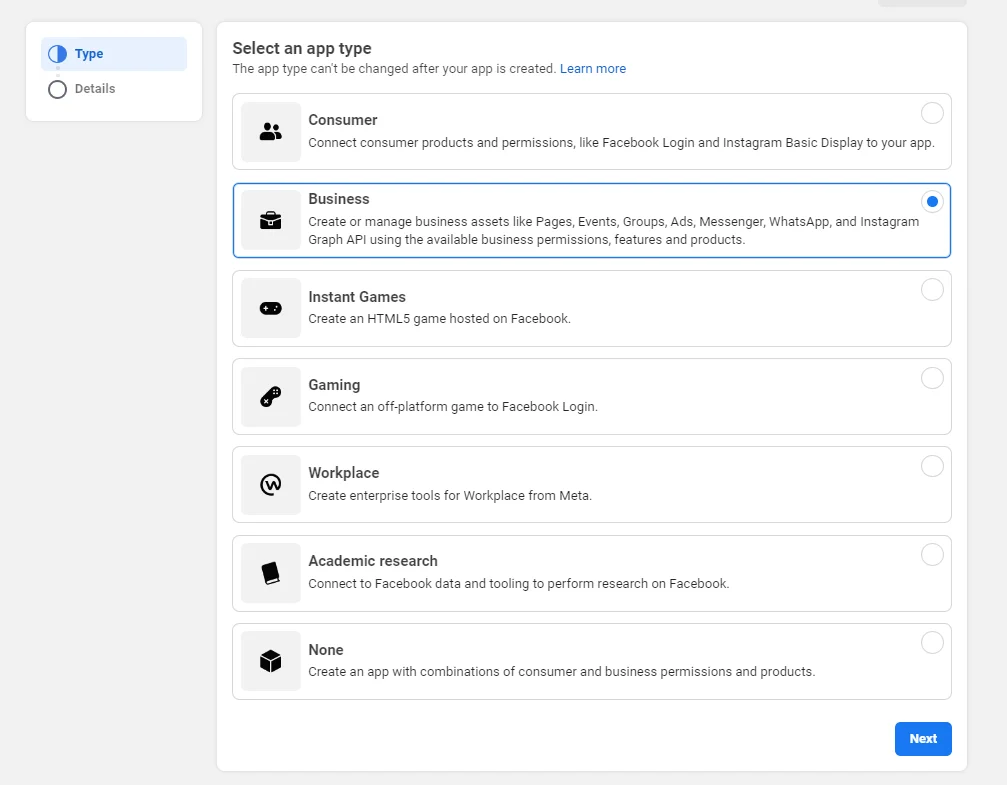
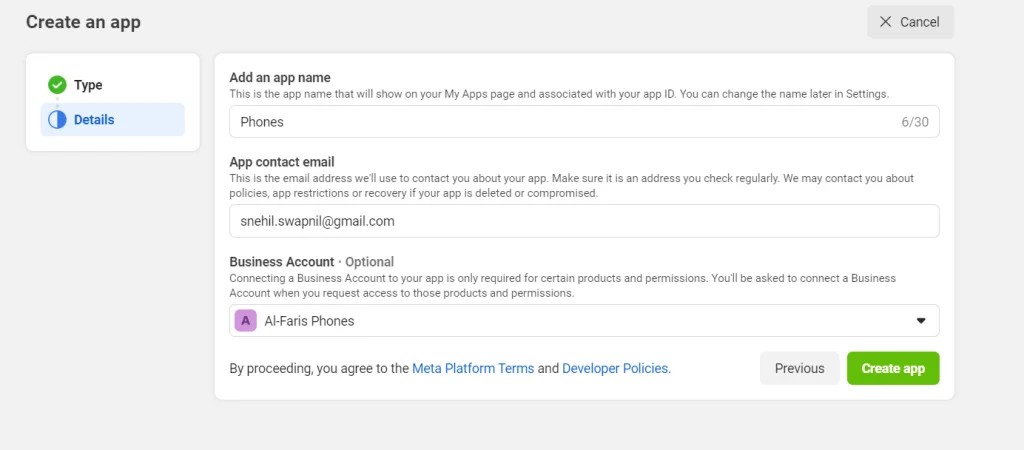
STEP 5: Give name to your App. You can write any name. This is only for reference number and won't be displayed anywhere. If you have multiple business account then choose the once into which you are planning to setup the api. Make sure you choose the right business account. It is written optional but if you are serious about using WhatsApp api then you must choose the business account. Because then only you will become eligible for business verification.
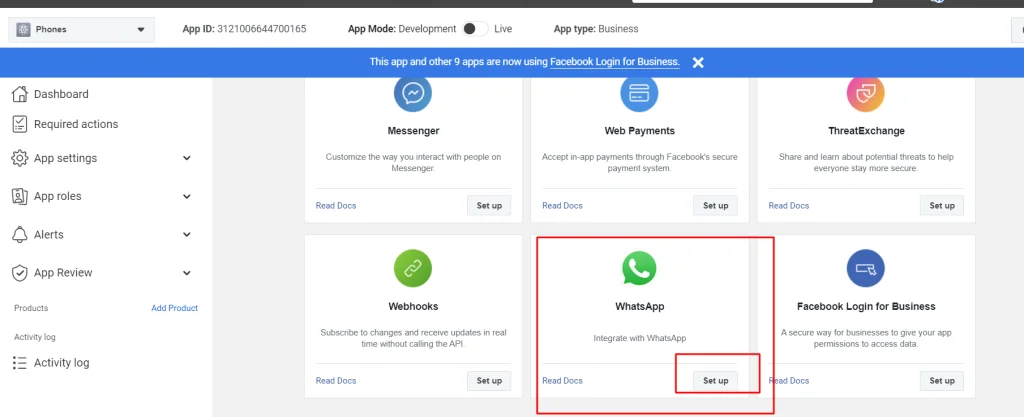
STEP 6: It will take you to your app dashboard where you have to scroll down to choose WhatsApp setup. Click on setup to procced to configure your WhatsApp API. Click continue in the next step and proceed.
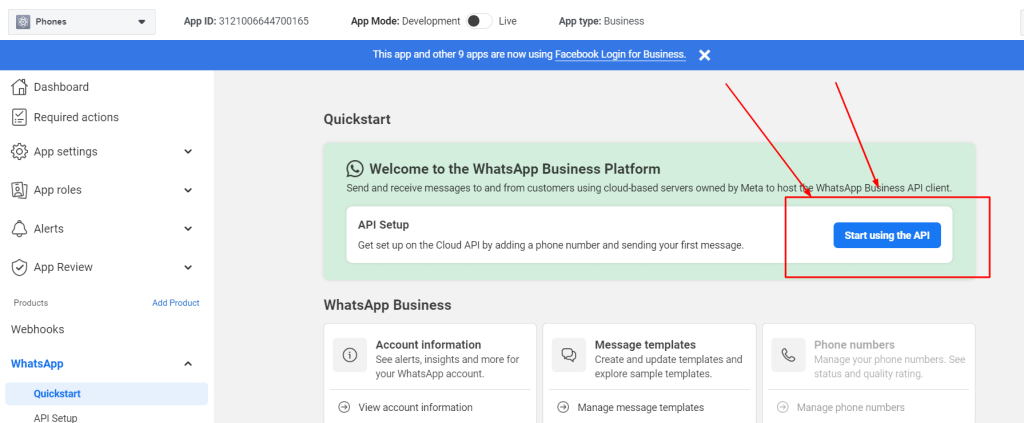
STEP 7: Complete configuration setup. Click start using WhatsApp API
STEP 8: Add Phone numbers to your WhatsApp API. For this you need to scroll down and add your number. You are initially allowed to add only two WhatsApp numbers. Also make sure that you add your payment methods right away at this place. This is 100% required if you want to run your WhatsApp marketing campaign.
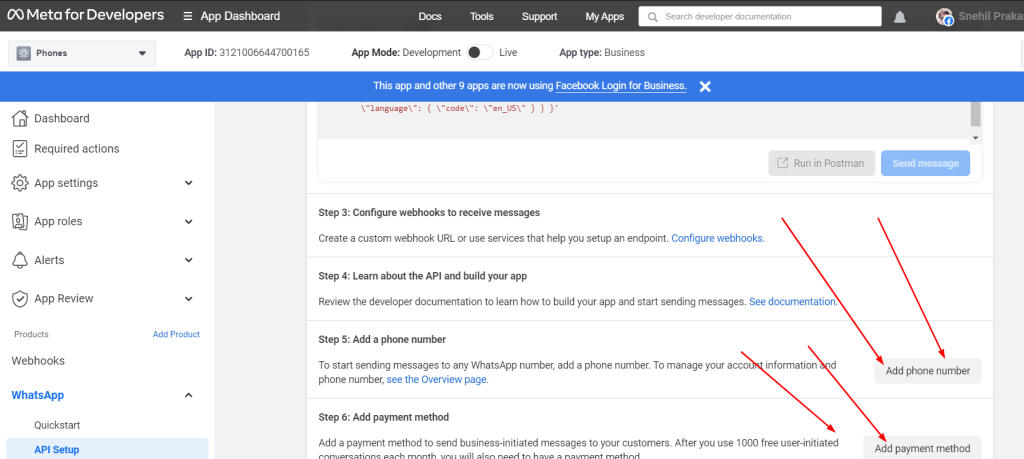
When adding phone numbers, you will have to enter your business name. Business website or profile page. [Recommended to add business website since it will also be added during business verification.
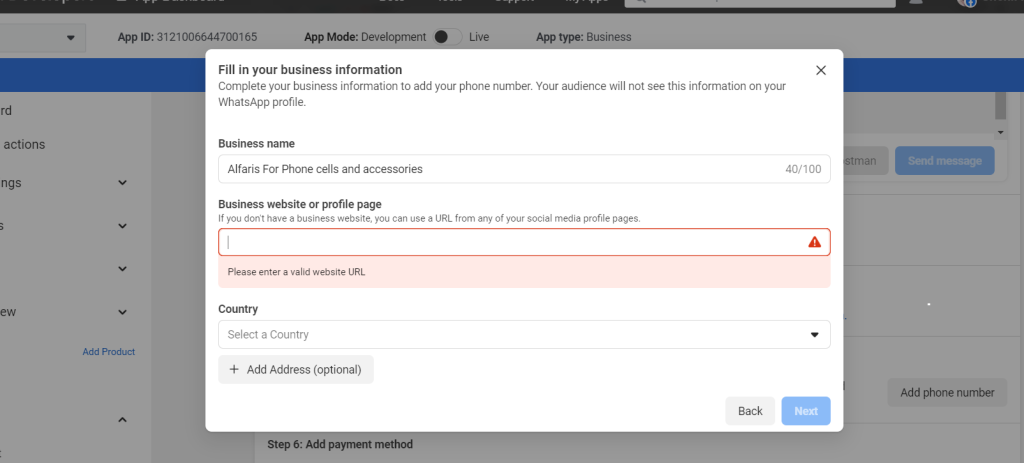
STEP 9: This is a very critical step. You must not do anything wrong in entering your info. In this step, you will add your WhatsApp Business Profile Display Name. This name should be your brand name. Business name is different, brand name is different. When you apply for a green tick, WhatsApp ask if your brand name is notable or not. They confirm this by asking you to share those website links from high authority sites that have mentioned this same WhatsApp Business Profile Display Name. It is your brand name. Enter the correct timezone because scheduled messages will go according to this time zone.
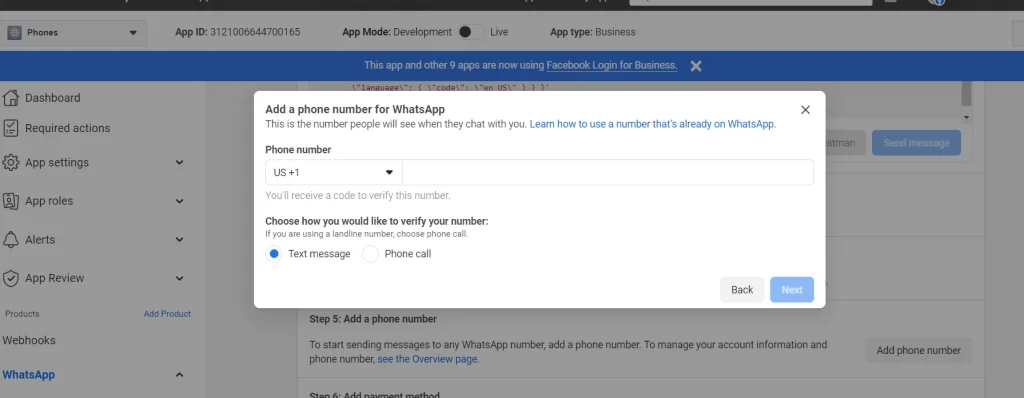
STEP 10: Enter your phone number and verify it with a security code sent to you via text message or call.
Once the number is added, you will be shown with an alert message on your API dashboard.
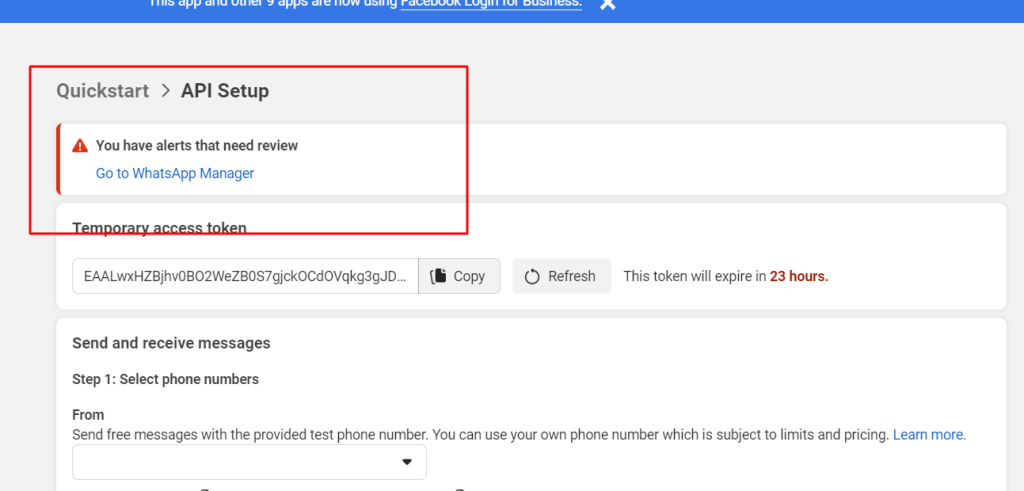
This happens because you have not verified your Facebook business manager account so you won't be able to use the API.
So, now go to the procedure explained in the LOOP below to complete your business verification process.
Want Us To Help?
In order to follow this path. You will follow the below step
STEP 1: Go to your business info page insider your business manager account of facebook. Click here business info [If you have multiple business facebook account then please choose the one over which you need to setup your api and also get your business verification done.
STEP 2: Here you need to enter all your business details. Don't skip any info. Your chances of rejection will increase. Also make sure that the information matches 100% as per your business registration document that you will be uploading during your business verification process.
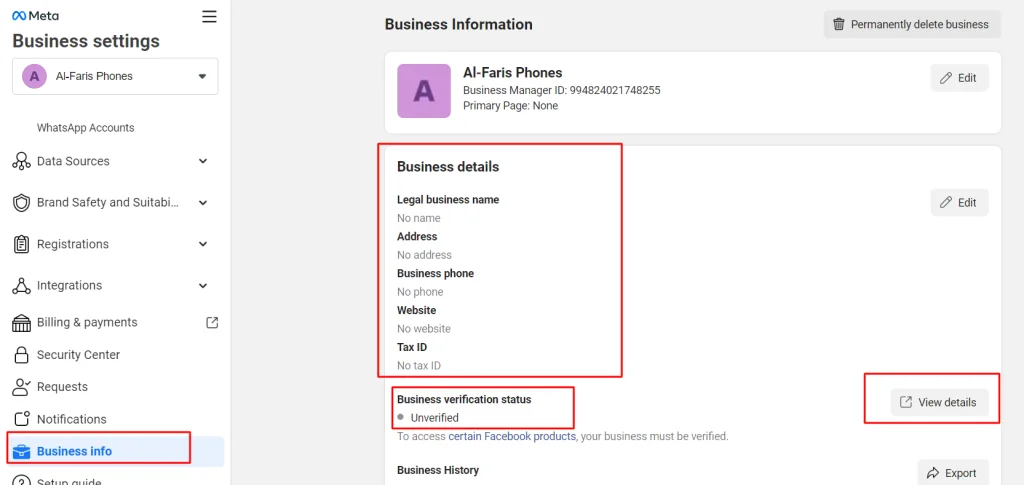
Once you enter all these details. You will have to click "View details" button that will take you to the page where you will begin the document submission.
But, as i said, if you follow loop 2, you will be shown that you are ineligible for business verification. Something like below.

You will face this error and won't be able to submit your documents for business verification. The reason is, people are eligible for busines verification only when you are trying to use advanced features of meta company like using an API.
So, if you follow this Loop 2, you wont be able to get your business verification done. This path is 100% wrong when you are planning to setup your Whatsapp API.
You will get stuck and look for solution or integration consultant at this point to solve this problem. While the solution is hidden in the Loop 1 process which I already explained above.
I am asusming that you followed the above loop 1 process that I explained. You have to visit the security center page of your facebook business manager account in order to complete your business verification process.
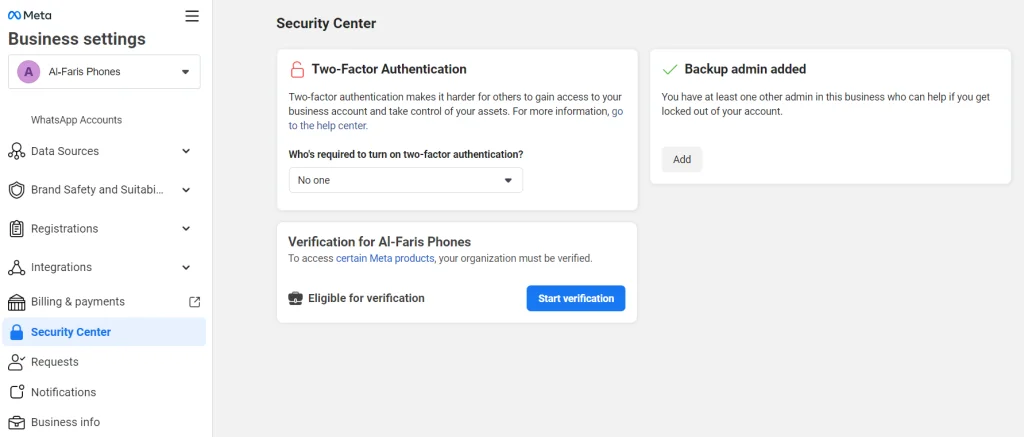
STEP 1: Click start verification and go to next dashboard. Choose your country and click next to enter all your business info correctly according to your business registration document.
There are multiple supported languages for business verification. So, if your business documents are in your regional language, you can upload them also.
The primary document types that are acceptable for business verification are as follows. Make sure these documents are not expired and are issued by the relevant authorities.
Please make sure to add your business website. As I already mentioned in the pre-requisite for starting the business verification in the beginning of this blogpost.
All these steps will help you to complete your business verification steps. You can submit the request. In less than 2 working days, your business will be marked as verified if you follow all compliance and policies correctly. If it gets rejected, you will get up to 3 chances to raise a request for re-review. If all those chances fails, you won't be able to get your business manager verified and using WhatsApp API will be impossible.
Now I assume that your business manager is verified. In the next steps, you have to implement your API with the WhatsApp marketing software.
It is important to note that you cannot run WhatsApp API-approved numbers in your WhatsApp mobile app. You must have to subscribe to a WhatsApp API-supporting application that will help you send WhatsApp messages and receive replies.
We are taking the example of the Sendwo Official API platform to setup your dashboard.
STEP 1: Signup to Sendwo official API application here
STEP 2: Go to WhatsApp feature to add your number. Click on "Add new account"
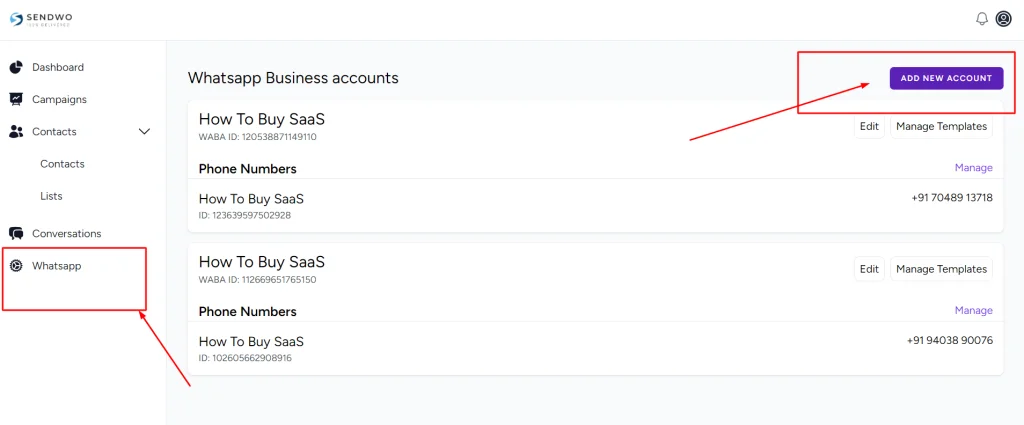
STEP 3: In order to add new number, you need to add your WABA ID and access token.
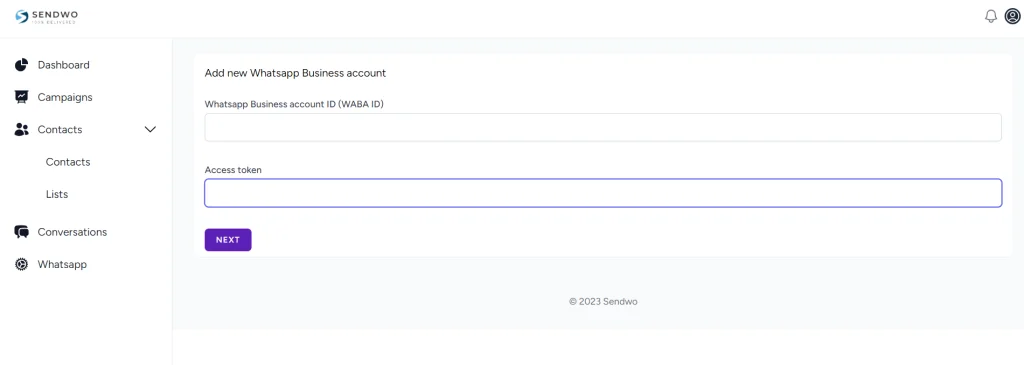
STEP 4: How to get the WABA ID and access token? Please follow the below step.
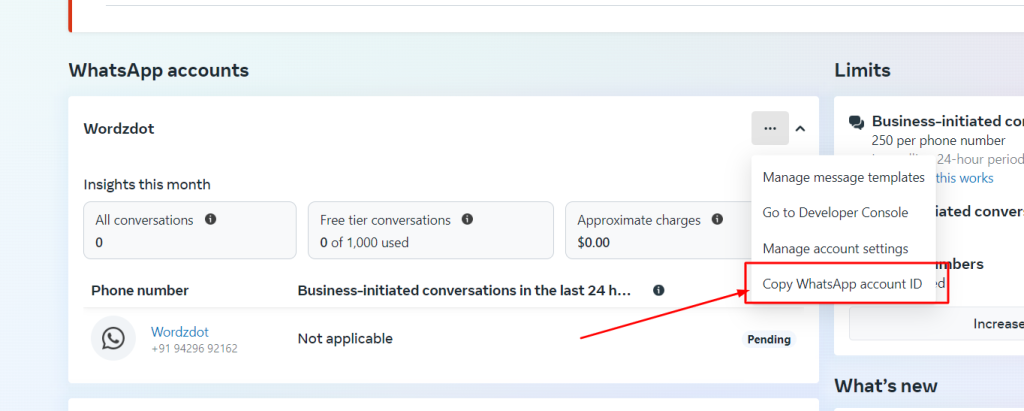
Go to your WhatsApp Manager dashboard from here
Here, choose the number which you want to link as per the image below, copy the WABA ID
STEP 5: Get the Access Token by following the step below.
In order to generate an access token, you need to add a system user. You may already have one. If not, check the screenshot below to understand how to create a system user and then generate the access token.
Go to the system user option inside your business manager from here

When you click on add, you have to click next and then a new dialogue box will open. Give a system user name and set it to admin.
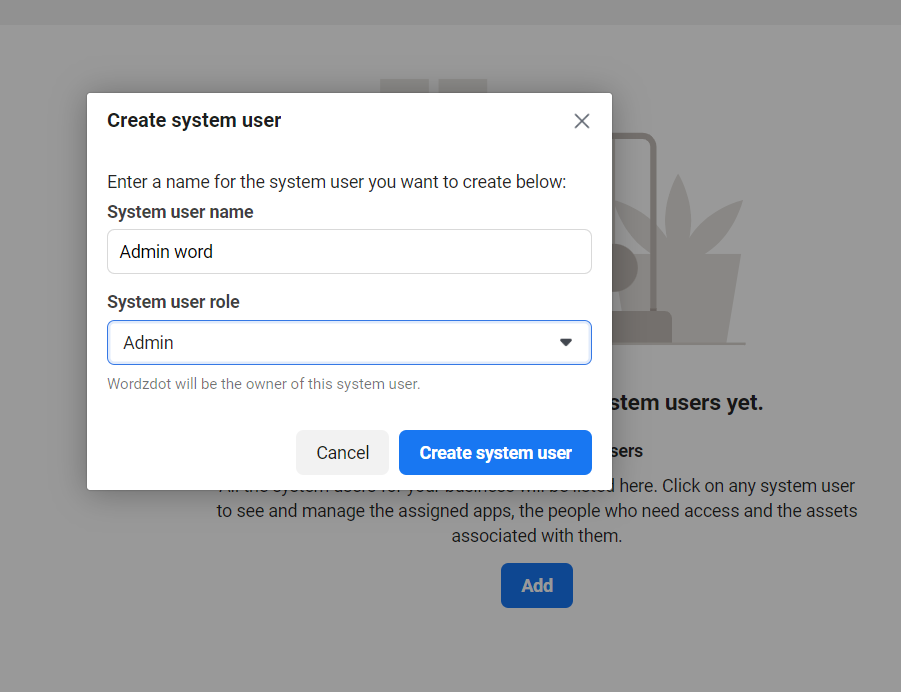
So, this will create a new dashboard that will help you generate your access token.
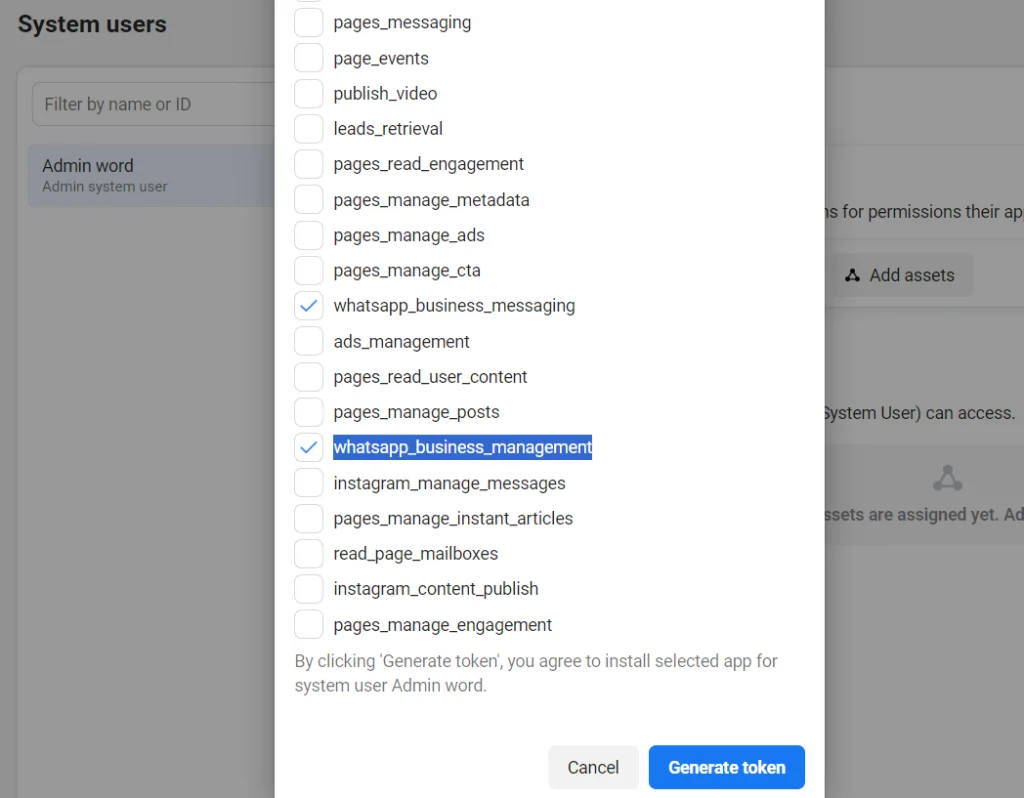
Click Generate access token, and select the app that you have created in the earlier step above on your business manager account. Then select the token expiration time to never and tick mark the option named as "whatsapp_business_messaging" and "whatsapp_business_management" just like the screenshot below and click generate the token.
Copy the new access token that will be generated and paste it inside the Sendwo dashboard just below the WABA ID.
Once you complete this process then your WhatsApp manager accounts get linked to Sendwo. In the next step, you need to fetch all the numbers that you have added inside your WhatsApp manager. So, lets go to STEP 6.
STEP 6: Fetching phone numbers inside dashboard. Click the "get phone number from facebook"
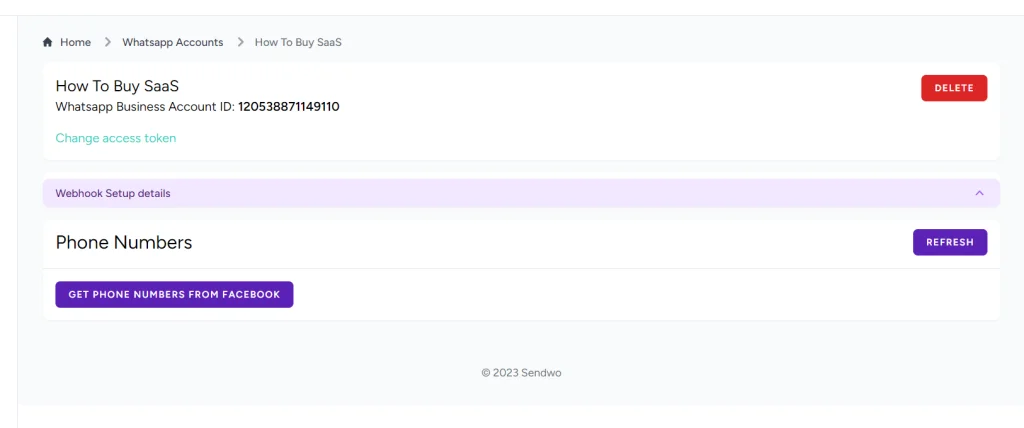
It will fetch the phone numbers that we have earlier added while setting up the phone numbers over API.
Click on ADD for the phone numbers that have been fetched from Facebook.
Now we need to setup inbox so that we can receive replies and send reply while having conversations over WhatsApp API-enabled phone numbers.
STEP 1: Go to WhatsApp menu inside Sendwo dashboard.
STEP 2: Click manage, over the phone number for which you want to setup inbox.
STEP 3: Click on webhook details and copy URLs and verification codes.
STEP 4: Go to your developer console of facebook where you have created the app for your API and go to configration option. Check the screenshot below to understand better
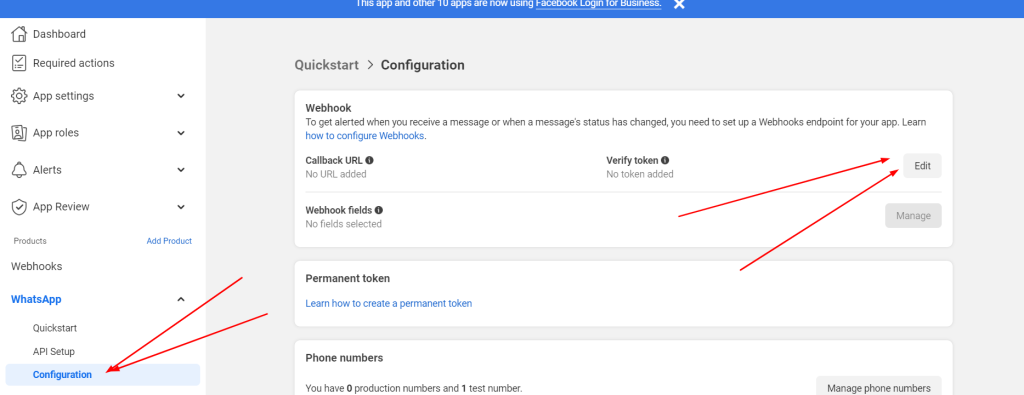
Here you have to click on edit as above and enter the webhook URL in the callback URL and webhook verification code inside the verify token option and then hit save.
You also have to click on manage button as in the above screenshot beside the "Webhook fields" and click on all check boxes to subscribe to all as in the screenshot below.
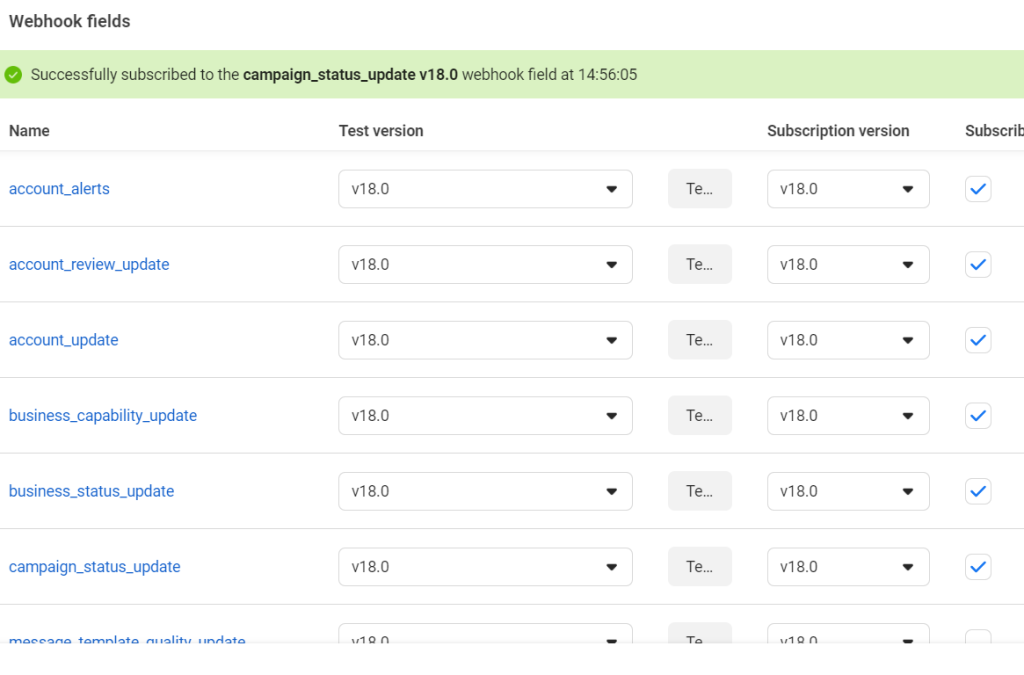
Hit done and you are all set.
This way you have setup your WhatsApp API and integrated it inside sendwo. Now you can easily create campaigns inside sendwo and run your WhatsApp marketing show.
Contact us if you are not able to setup the API and implement it over Sendwo or any other software. We will help.
Want Us To Help?

